I've been very, very busy lately, and for that reason I haven't really been keeping up with my photography hobby like I used to. I come home and I want to take pictures, but I don't have any inspiration or cool ideas left.
So I came up with a super cool, super novel idea (I'm being very sarcastic about the cool/novel part).
Next time you feel uninspired, take an hour or two and look through the pool of your favorite flickr group. You'll run across a couple cool photos, maybe find a new contact or two, and definitely, definitely get some ideas.
It's better than refreshing twitter and facebook for an hour, no?
Friday, June 26, 2009
Thursday, June 25, 2009
Self Critique: Wedding Pictures
So, if you take a look at this article, self critique isn't really worth it.
I call shenanigans.
Although you're certainly biased by the act of creation, there is no reason that a skilled and knowledgeable photographer cannot critique their own images, to an extent. Critique from others is a very valuable tool and input should be accepted, since ultimately we photograph to be able to please other people that look at our pictures. But, as an artist, a photographer also should have an idea of how he wants his pictures to look - and vision is not something that can be judged by another photographer.
So, critique should be done by yourself and accepted from others, together. Walk the middle path. Now that that's out of the way, I'm going to do some self critique of some pictures I took at my first wedding.
Before I start though, I would like to say that the only reason I was able to shoot at this wedding was because of the generosity of wedding photographer Deborah Cull, whose website can be found here. She is one of the nicest people I have ever met and has been more than willing to take time with me when she has no obligation to do so, and I am very grateful for that.
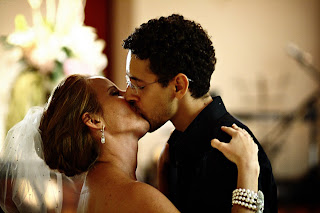
I like this one, just because it's about the only time I was able to capture a "moment". I'm glad I didn't use flash, because that would have ruined the mood, and the light as-is gave them a sort of rim light. The DOF is good, because the background was distracting, and it still kind of is - I should have moved the flower behind her head out of the frame, as it's too bright as is relatively distracting. Looking at it right now I'm thinking their faces should be a little brighter as well - maybe I need to spend some more time with this in PP.
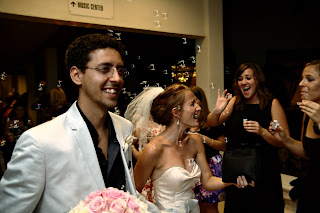
Paparazzi shot. I did bounce flash on this, behind me and to my left (there was little to no ambient). I light the quality of it, for the most part, but I can still see shadows from the flash. Unfortunately, I don't think I could have done much about that without setting up an umbrella or two. The sign up top is slighting distracting, but the exposure looks good (to me). I like the expressions.
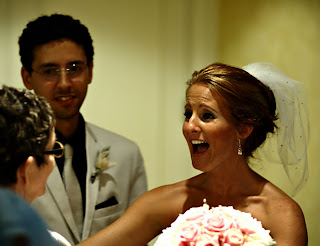
The moment and expression make this photo worth something - the light is terrible. She was directly under an overhead tungsten light in this one, and I definitely should have bounced some flash here to relieve those shadows a little bit. I actually did do that later on, which yielded technically better pictures, but none of them had this mood to it. The shoulder in the lower left bothers me as well - goes to show how hard it was to remove unwanted elements from the frame. The flowers are overexposed, but I don't think it's a huge problem. The white balance might be just a tad warm.
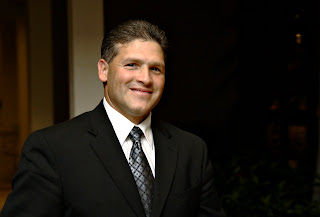
And here we have shadows generated from flash bounced overhead. Dark eye sockets are certainly not attractive - a bounce fill card might have helped out.
Shooting this wedding was a good experience. It let me see what the experience was like, and I got to watch some professional photographers at work. I got an idea of what I need to work on, and it made me realize I still have a lot of work to do technically before I can really express myself and capture what I want to capture.
In any case - I've critiqued myself. I'd love it if you'd drop me a line in the comments and give me your critique now.
Friday, June 19, 2009
How to Get a Correct Exposure
Anyone who's been doing photography for a while probably knows how to nail the exposure on their pictures most of the time. That being said, there are still some difficult situations and some tips for getting a great exposure in camera that it doesn't hurt going over again.
This assumes a basic understanding of stops, camera controls and other basics. If you need refreshers or are just starting photography, you might want to check out this page.
Understand how the camera meter works.
Your camera meter wants to expose the scene for 18% gray. Keep this in mind, because you need to...
Adjust exposure for bright or dark scenes.
Imagine that you're taking pictures of bright, white snow. You aim your camera at the snow to get a reading, adjust your settings for proper exposure, and click away. But all your pictures come out a muddy gray! Remember, the camera meter wants to expose the scene for 18% gray. This means it will underexpose anything that is brighter than 18% gray. So what do you do? Increase the exposure a stop or two, until you get nice, white snow.
The opposite is true for dark scenes - the camera will overexpose them to bring them up to 18% gray. So underexpose them until they look in camera to how you see them with your eye.
Overexpose bright scenes, underexpose dark ones. This might seem counterintuitive at first, but think about it for a bit. It'll make sense.
Check your metering mode.
If you aren't familiar with the different types of metering modes in your camera, check out your camera manual. Usually, the different modes meter from different parts of the viewfinder, so that you can choose which parts of the scene you want to exposure "properly".
Since I usually do portraits, I usually leave my camera in center-weighted metering. If my camera had spot metering, I'd use that so that I could meter off the face.
Use your histograms.
Check your camera manual to figure out how to enable histograms. It doesn't matter which type of histogram you use (luminosity or RGB), just that you take a look at them when you're trying to nail down exposure. Especially watch out for clipped highlights and shadows. If you don't know what a histogram is, check out this article for an overview of them. They're not hard to understand, and they are very, very useful.
Watch for blown highlights.
Most cameras have a feature that shows black blinking over overexposed highlights. If you see white blinking with black, you wont' be able to recover any detail in those areas - so you usually want to decrease your exposure a stop or two until you stop seeing those blinking areas.
Do not try to judge exposure by eye.
You will have problems. The little LCD on the back of your camera isn't really big enough to accurately check focus without zooming in, and it definitely isn't accurate enough to check your exposure. The histogram is a much more reliable method.
Shoot in RAW!
It's been said time and time again, but shoot in RAW! This not only gives you control over your photographs as far as contrast, white balance, and so on goes, but also allows you to adjust exposure (to an extent) after the fact. I rarely get spot on exposure the first time around, and I usually end up adjusting the exposure a little after the fact. No one can nail exposure every time.
So that's about it from me as far as getting proper exposure goes. If you have any other tips drop a line in the comments below.
Wednesday, June 17, 2009
Right Tool for the Right Job
A lot of people around me seem to have been buying cameras. XSi's, D40's - nothing super expensive, but still, a sizeable chunk of cash for someone that isn't interested in photography as a serious hobby. These people seem to think that the fact that they have a bigger, more expensive camera means their pictures will be better. Not necessarily so.
Don't get me wrong, there are definite reasons to get a DSLR, and definite benefits. Some of them include higher image quality resulting from a larger sensor, increased dynamic range, minimal shutter lag, versality of interchangeable lens systems, ability to use on and off camera flash, ease of use, the ability to record in RAW format (although many compacts can do this now too), ability to gain a shallow DOF with proper lenses, and the ability to capture action scenes with continuous drive shooting. A rather long list, and I'm sure I could add to it if I thought some more.
But here's the thing - you have to know how your camera functianually if you want to reap the benefits of all the advantages mentioned above. You can't get a shallow DOF if you're in full auto mode and have no control over your aperture. You can't take advantage of increased dynamic range and detail if you don't know how to bring out whatever the camera captures in post processing. Most people, and most pictures, don't even need that level of detail to begin with.

A DSLR is big. The lenses are bulky and are a pain to carry around on long days and trips, and it takes a while to switch between them. They're versatile, powerful tools, but only when the photographer holding it is knowledgeable and is prepared for the type of pictures he wants to take.
The end story is this - if you truly want to get into creative photography - ie., photography for a purpose other than just recording life events - and are willing to put the time in to learn about it, go right ahead and get a quality DSLR and invest in some lenses. You won't regret it.
But if you simply want a camera to take the occasional picture and record trips and parties, there is no reason to drop $800 on a DSLR and a lens or two. Pick up a quality compact camera or superzoom for $250-$400. It'll serve you just fine, especially with the newest generation of quality compacts. You'll be more likely to carry it around, and it'll give better picture quality without you having to learn much. If you eventually do get interested in photography then you can take manual control of it and then, if you want to, you can get a DSLR.
Think about what you're spending money on. It's like watching someone lug around a sledgehammer to drive nails when a hammer would do perfectly.
Tuesday, June 16, 2009
Tamron 17-50mm f2.8 - Initial Impressions
Until now, I've been using a miserable excuse for a midrange zoom, a Canon 28-80mm f3.5-5.6. I found a good excuse to convince my parents to allow me to spend even more money, and I was able to find a very lightly used Tamron 17-50 2.8 at B&H, which I promptly ordered. It arrived earlier today, and even though I wasn't able to play around with it too too much since I got home from work late in the day, I have had enough time to form some initial impressions.
First off, it's a lot heavier and better built than the lens I was using previously. Just a little bit bigger, but it's the perfect size for a small DSLR like the XS. Lots of plastic (most everything is plastic except for the lens mount, which is metal), but it's a pretty high quality plastic. I thought this would bother me, since I'm a sucker for build quality, but the build quality on this lens is pretty good - definitely good enough to keep me happy.
Its zoom ring operates the opposite direction from Canon's zoom rings, which is a bit disconcerting at first, but I'm sure I'll get used to it. The zoom ring was a bit stiff when I first got it, but it loosened up quickly and stayed at a reasonable level. It comes with a zoom lock button, but I don't think it'll be needed. The included lens hood is pretty decently made, although a little flimsy compared to the hood for my Canon 70-200mm f4L.
The autofocus is very fast, but it produced a very high pitched whine when it rotates. The autofocus path is small (probably around 45 degrees) and the ring rotates quickly, but it's so high-pitched that I would hesitate to use it in any quiet situation. I'm going to be helping with a wedding next week and I'm seriously concerned about the noise of this autofocus being disruptive - if you're thinking about getting this lens, make sure that noise won't be an issue.
It's truly wide-angle on the crop body as well, which is a pleasant experience for me, since I haven't been able to use a wide-angle on my digital camera yet.
All reports say it's tack sharp, and my images so far give no reason to expect otherwise, but I'll do some more in depth testing tomorrow and post the results when I have them.
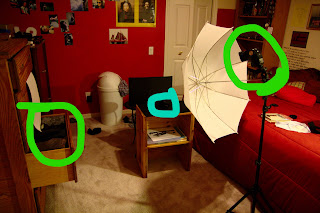
For those of you who are interested, I took the above shot with two strobes. You can see the setup to the right. I had a Canon 420ex at full power (it's auto only, so when it goes off camera I have to use it at full power) firing into a white sheet of foam paper to diffuse it on the left, and a Vivitar 285 at 1/4th power through an umbrella above and to the right of the lens to create the highlight. I used black pieces of foam paper for the ground and backdrop. The strobes are circled in green, and the position of the lens in blue. Forgive the clutter, I do all these shots in the confines of my room.
More to come tomorrow!
Friday, June 12, 2009
Laser Pointer as a Focus Aid

So I was off on Amazon at one o'clock in the morning the other day, merrily clicking on photography-related goodies. I searched for a microfiber cloth, and the my surprise this little gadget popped up.
Now, what guy doesn't like a laser pointer? I've never considered buying one, because I thought the decent ones were all pretty expensive, and I have much more important things to spend my money on - like microfiber clothes to clean my lenses! But hey - this thing was only $11, it claimed it was pretty powerful (or just below legal), and, most of all, it was green.
So that's pretty cool. It came in yesterday, and I really haven't stopped playing around with the thing. For $11 it's pretty fun, especially if you have a cat - they'll chase the light for hours on end.
How does all this relate to photography, you ask? Well, one of the first things I did when I got it was to set up my camera on a tripod and completely darken the room. Of course, autofocus didn't work, since there wasn't any light. But if I selected a single autofocus point and then shined the laser at the focus point, the camera focused just like it was bright and sunny outside. Simple and easy (and super cool looking).
Of course, I wouldn't use this in night time portraiture. Still lifes only please. And I imagine a small flashlight would do just about the same job for you.
But... who wants to use a mundane flashlight when a nifty green laser will do the same thing?
Wednesday, June 10, 2009
Learning to Light in Progress
I was lucky enough to have two of my high school acquaintances volunteer to model for me today so that I could play around with some off camera lighting.
I recently got several comments about how shadows were more or less ruining my natural light shots. This shoot was an attempt to work at that. So I'm going to cover some of the shots and analyze them myself to see what I can get from the day - if you have anything to add be sure to leave a comment either here or on my flickr.
Flash

Natural Light

Personally, I like the shadows in the natural light one. They seem to add some depth and feeling to the photograph. However, there is also something to be said for the flash-enhanced picture as well - the relative lack of shadows creates a more perfect look to the subjects complexion (in my mind, anyway).
If I could go back and shoot this exact picture again, I think I would drop the flash exposure a stop being the ambient. Here they were more or less perfectly balanced. Dropping the flash would have relieved the harshness of the shadows in the natural light picture, but still allowed for some depth.
Flash

Don't have a natural light picture to compare this to, as this was pretty much an all flash-lit picture (the ambient was pretty low). The lighting overall is decent, I think, but I would have liked to relieve the shadows beneath her chin and from her hair. A second light to camera right would have fixed that, although a reflector could do the job just as well I believe (as one person already commented in my flickr). I think a reflector definitely needs to be my next camera-related purchase. I'm seeing it becoming more or less a necessity if I'm going to be using only one flash.
Flash

I had the flash on them in this one, but you can't see it. Note to self - research proper methods for overpowering and balancing flash in direct sunlight.
That's all for now folks. I'll edit this post to include more from today once I have them edited.
I recently got several comments about how shadows were more or less ruining my natural light shots. This shoot was an attempt to work at that. So I'm going to cover some of the shots and analyze them myself to see what I can get from the day - if you have anything to add be sure to leave a comment either here or on my flickr.
Flash
Natural Light
Personally, I like the shadows in the natural light one. They seem to add some depth and feeling to the photograph. However, there is also something to be said for the flash-enhanced picture as well - the relative lack of shadows creates a more perfect look to the subjects complexion (in my mind, anyway).
If I could go back and shoot this exact picture again, I think I would drop the flash exposure a stop being the ambient. Here they were more or less perfectly balanced. Dropping the flash would have relieved the harshness of the shadows in the natural light picture, but still allowed for some depth.
Flash
Don't have a natural light picture to compare this to, as this was pretty much an all flash-lit picture (the ambient was pretty low). The lighting overall is decent, I think, but I would have liked to relieve the shadows beneath her chin and from her hair. A second light to camera right would have fixed that, although a reflector could do the job just as well I believe (as one person already commented in my flickr). I think a reflector definitely needs to be my next camera-related purchase. I'm seeing it becoming more or less a necessity if I'm going to be using only one flash.
Flash
I had the flash on them in this one, but you can't see it. Note to self - research proper methods for overpowering and balancing flash in direct sunlight.
That's all for now folks. I'll edit this post to include more from today once I have them edited.
Tuesday, June 9, 2009
Ground Zero
Perhaps "Cyberspace Zero" would be a more appropriate title?
Hello everyone! My name is Christopher Honiball, and I am an amateur photographer. Welcome to my blog.
The purpose of this blog is to help me on my way to becoming a better photographer. I don't really think I'll ever become a full time working professional, but I would love to be at that level and be able to have it as a side job. This blog will give me a place to post my progress, my projects, my insights and discoveries. I'd like to share information with anyone reading this as well.
If you're reading this, please hold me to that promise. When I thought about what types of blogs I read, I discovered that I read them all for one reason - I garner valuable information from them. I usually like the personality and writing style of the blogger as well, but that's a secondary issue. The information is much more important to me. For that reason, I would like this to be a mostly informational blog, although that isn't to say I won't include a healthy smattering of philosophy in between the facts.
To start off with the informational theme, I'll provide you with some links to websites that I've found extremely helpful with learning photography. If you have any to add be sure to link it in the comments (I'm always looking for new photography websites).
Digital Photography School - Fantastic information on the blog portion, but the forum here really shines for me. It's just the right size to where people know each other and the community is fantastic. Check it out.
Strobist - As the website says, everything you wanted to know about light. If you're into photography at all you've probably heard of this one by now.
Flickr - Probably heard of this one too. Personally my favorite site for uploading photos, and it's a great place to network and find other photographers that inspire you.
Photocrati - Solid information here, covering a wide variety of photography topics.
The Online Photographer - Frequently updated with more solid information, as well as links to excellent photographers. Worth putting on your RSS.
Photozone - Excellent lens reviews as well as a pretty decent tips section. Be careful of this site though. Seeing all those lenses listed right in front of you might give you lens lust (I know that's what it does to me anyway).
Photonotes - Some really excellent and extensive information regarding lenses and canon camera systems. Defintitely worth checking out if you need a technical primer on how your camera/lens works.
Meet the Gimp - I use the open source program GIMP (Gnu Image Manipulation Program) for my picture editing needs, and this site helped more than any text based tutorials I've ever used.
Fraction Magazine - Puts out issues of an online magazine featuring up-and-coming excellent photographers. Worth checking out for inspiration's sake.
I think that's about all for now. I'll amend the list as I find more/dig more out of my bookmarks.
Future posts: A list of excellent photographers that I follow for inspiration/advice, and I'm going to try to set out a plan for my own development. Wish me luck.
Subscribe to:
Posts (Atom)

